It’s London morning in Muscat. My work window starts at the beginning of the London session and ends near the end of the New York session. I open my charts and the first thing I do is check EURUSD H1 ATR. If it’s normal, I stick to my normal preset: H1 for structure and M5 for entries. I don’t want a strategy that changes every five minutes, but I also don’t want to ignore volatility and high-impact news. So I use a simple structure: two timeframes for trading (structure + trigger), and one extra timeframe only for volatility regime. I then check the economic calendar for anything high-impact. If there’s a major release, I plan to be flat around it.
I mark one clean H1 bullish order block that caused a strong displacement and took a prior swing high. Price later retraces into that zone. I don’t buy just because it touched. I drop to M5 and wait for a micro-CHoCH: price stops making lower highs and closes above the nearest opposing swing high. That close is my confirmation that reaction is likely in motion. Then I enter with a stop beyond the invalidation and I target the nearest liquidity first. When the market is fast, I take profit sooner; when the market is calm, I can aim for a cleaner 2R.
The core idea in one sentence
I use a Higher Timeframe (HTF) Order Block to define where I want to trade, a Lower Timeframe (LTF) micro-structure shift (CHoCH) to define when I’m allowed to enter, and I use H1 ATR as a quick volatility regime filter to choose the right two-timeframe combo for the day.
Definitions
| Term | Meaning (simple) |
|---|---|
| Order Block (OB) | A candle or small group of candles that preceded a strong move. In OB trading, it marks a zone where large orders likely existed. |
| HTF / LTF | Higher Timeframe (structure) and Lower Timeframe (entry/trigger). Example: H1 for structure and M5 for entry. |
| Retrace | Price returns back into a previously marked zone after moving away. |
| Touch vs Close-in-zone | Touch: any wick/body enters the zone. Close-in-zone: the candle must close inside the zone (stricter). |
| Internal market structure | Local swing highs/lows on the entry timeframe that form the short-term trend. |
| Swing high / Swing low | A local peak or trough. For example, a swing high is higher than the highs of a few bars around it. |
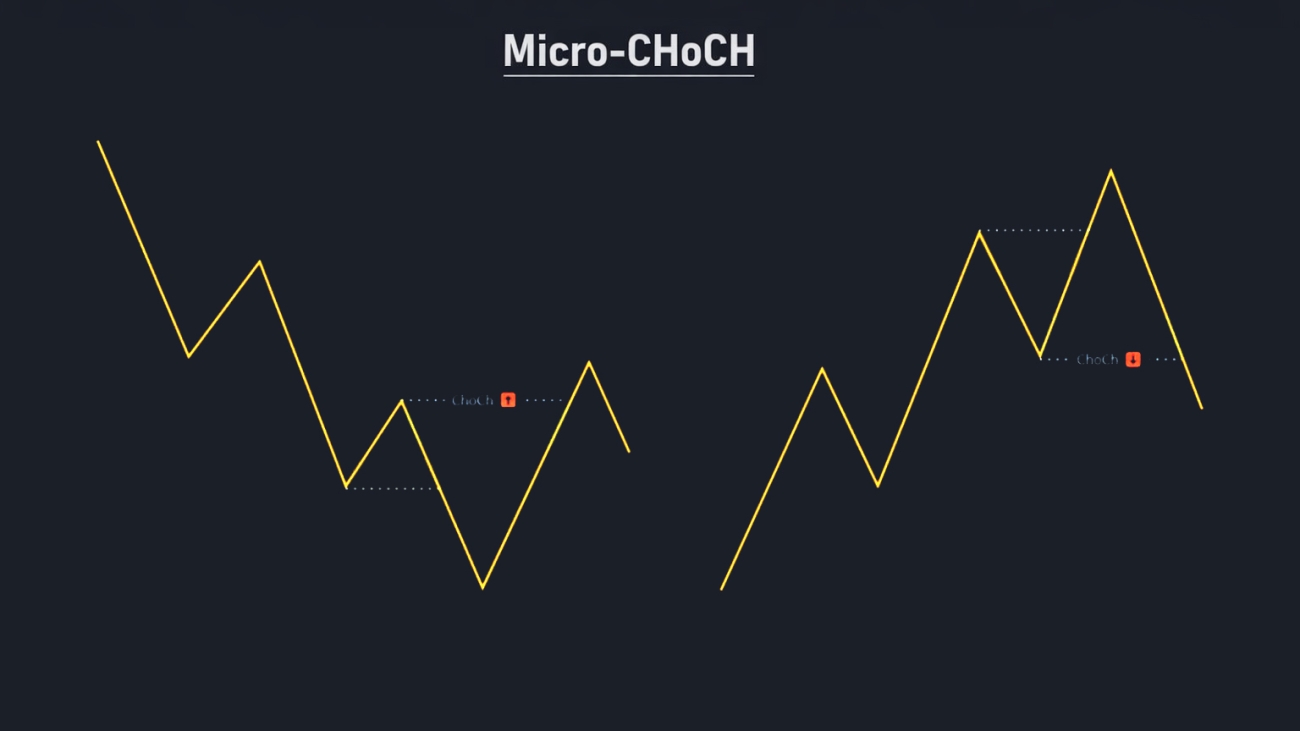
| CHoCH (Change of Character) | A small structure shift: the market stops making lower highs and breaks a key swing high (or vice versa). |
| BOS (Break of Structure) | A structure break that continues the prevailing direction (often HTF). |
| Displacement | A fast, impulsive move away from an area (often measured with ATR or a strong candle body). |
| Liquidity sweep | Price briefly takes a prior high/low (stops) and then reverses. |
| ATR | Average True Range: a volatility measure. Higher ATR means larger typical movement. |
| R multiple | Risk unit: if your stop is 10 pips, then 2R take-profit is 20 pips. |
My best trading windows in Muscat time
I prefer to trade when liquidity is naturally high. For EURUSD, the best consistency usually happens around London open and during the London–New York overlap.
- London open focus: 12:00–15:00
- London–New York overlap (often best): 18:00–21:00
- Late New York (optional, lower quality): 21:00–00:30
Note: Exact session clocks shift when London/NY change daylight saving time. I keep the idea the same (trade the open and the overlap), and I adjust the clock times on my calendar when DST changes.
The third timeframe: volatility regime check (H1 ATR)
For EURUSD, I prefer EURUSD-based volatility measures over VIX. VIX is equity volatility; it can help as a risk mood hint, but it isn’t the same as FX volatility. So my daily volatility check is H1 ATR(14) on EURUSD. H1 is fast enough to capture today’s conditions, but stable enough to avoid M1/M5 noise.
My simple regime rule
- Compute H1 ATR(14) and compare it to a rolling average (e.g., a 20-day average of H1 ATR).
- If today’s H1 ATR is around normal: trade the normal preset.
- If H1 ATR is clearly elevated: use a slower trigger timeframe and stronger HTF zones (reduce noise).
- If H1 ATR is very low: expect range behavior and be selective (or use a higher trigger TF to avoid overtrading).
Best-practice two-timeframe presets for day traders
Instead of switching timeframes randomly, I keep 2–3 preset combinations. This gives me a consistent process while still adapting to volatility and news days.
| Regime | Structure TF (OB) | Trigger TF (Entry) | Why this works |
|---|---|---|---|
| Normal day | H1 | M5 | Clean enough zones + precise entries; good trade frequency for a day trader. |
| High volatility / messy day | H4 | M15 | Stronger zones + fewer whipsaws; reduces fake-outs when candles are violent. |
| Low volatility / range day | H1 | M15 | Fewer signals and less noise; avoids overtrading in tight ranges. |
High-impact news: what I do (and what I avoid)
On days with major releases (CPI, NFP, FOMC, ECB decisions, etc.), the worst habit is forcing entries during the release spike. OB zones can be pierced by wicks and spreads can widen. My rule is simple: I either stand aside around the event or I only trade after the market rebuilds clean LTF structure.
- No new positions shortly before the release.
- No trades during the immediate spike.
- After the release: wait 15–60 minutes and require a clean LTF structure + micro-CHoCH inside/near the zone.
- If the day is pure chaos (wide spikes both ways): I switch to the high-vol preset or I stop trading.
How I identify a high-probability HTF Order Block using my own indicator
I don’t draw OBs everywhere. I only care about OBs that look causal.
- The OB should precede displacement (a strong impulsive move away).
- Prefer OBs that also break structure (BOS/CHOCH) on the HTF.
- Freshness matters: first touch is best; I usually ignore second/third touches unless I have strong confluence.
- I define the zone consistently: wick-based (high/low) or body-based (open/close).
Definition 1: What counts as a retrace into the OB zone?
For beginners, this is where confusion starts. So I define it explicitly and keep it consistent.
Two valid definitions (choose one):
- Touch rule (common for day trading): Price has entered the zone if any LTF candle’s high/low overlaps the zone. This captures wick touches and helps me not miss reactions.
- Close-in-zone rule (stricter, fewer trades): Price has entered the zone only if an LTF candle closes inside the zone. This reduces false drive-by touches but can miss quick bounces.
My best-practice approach: I use the touch rule to arm the setup, but I still require LTF structure confirmation (micro-CHoCH) before I enter.
Definition 2: What is internal market structure on the LTF?
Internal market structure is simply the local swing highs and swing lows on the entry timeframe. I need it because CHoCH must break something real, not random noise.
Beginner rule: On M5, I treat a swing high as a candle whose high is higher than the highs of the 2 candles on each side (and similarly for swing lows). On M1, I may use 2–3 candles on each side to reduce noise.
Definition 3: What is the break of the immediate opposing swing?
This is the micro-CHoCH trigger in one line: after price enters the zone, I wait for a candle close that breaks the nearest opposing swing point on the LTF.
- For a LONG inside a bullish/demand OB: Mark the most recent LTF swing high formed during the push down into the zone (the last lower-high). A valid micro-CHoCH is an LTF candle close above that swing high.
- For a SHORT inside a bearish/supply OB: Mark the most recent LTF swing low formed during the push up into the zone (the last higher-low). A valid micro-CHoCH is an LTF candle close below that swing low.
Best practice: use close-based breaks (not wick-only) to reduce fake-outs.
My step-by-step entry workflow (the checklist I follow)
- Volatility check (H1 ATR): decide whether today is normal, high-vol, or low-vol.
- Select the preset combo (example: normal = H1 + M5).
- Mark the HTF OB that caused displacement and ideally broke structure.
- Wait for price to retrace into the OB zone (touch arms the setup).
- On LTF, wait for a micro-CHoCH (close-based break of the immediate opposing swing).
- Enter on the break close (aggressive) or on the retest/mitigation (conservative).
- Stop-loss goes beyond invalidation (OB edge or the LTF swing that formed the CHoCH) plus a small buffer.
- Targets go to the nearest liquidity / opposing swing; consider partial take-profit and a runner.
Risk management: why this matters more than the entry
Order blocks are zones, not magic lines. My edge comes from selecting good zones, confirming reaction, and managing risk. If I lose control of risk on high-vol news days, no entry model will save me.
- I risk a fixed percentage per trade (not a fixed lot size).
- I avoid trading when spreads are abnormal or fills are poor.
- If the OB is too large for my stop tolerance, I either refine on LTF or I skip the trade.
- I stop after a predefined number of losses for the session (to avoid revenge trading).
Dynamic vs static: should I change timeframes every day?
I don’t believe in random switching. I believe in controlled adaptation. A completely static strategy ignores volatility and news regimes; a completely dynamic one turns into guessing. The best practice is to keep a small menu of presets and switch using objective rules (like H1 ATR regime and a known high-impact news schedule).
- Keep 2–3 presets only (for example: H1+M5, H4+M15, H1+M15).
- Use one volatility check (H1 ATR) and one news check (economic calendar) to pick the preset.
- Don’t redesign rules mid-session. If you change, change only at planned checkpoints (before London, before NY).
Common mistakes (and how I avoid them)
- Drawing too many order blocks and treating all of them as equal.
- Entering on the first touch without any LTF reaction confirmation.
- Using M1 triggers on high-vol days and getting chopped.
- Trading major news spikes with normal-day rules.
- Using a fixed lot size instead of fixed risk per trade.
FAQ
What is the best timeframe combination for day trading EURUSD with order blocks?
A common best-practice combo is H1 for the order block and M5 for the entry trigger. On high-volatility or news days, many day traders switch to H4 for structure and M15 for entries to reduce whipsaws.
Is VIX a good volatility indicator for EURUSD day trading?
VIX can hint at risk-on/risk-off mood, but it measures US equity volatility. For EURUSD, EURUSD’s own ATR (such as H1 ATR) is usually a more direct volatility check.
What does it mean when price retraces into an order block?
It means price returns into the order block zone after moving away. You can define entry as a touch (wick/body overlap) or a close inside the zone (stricter).
What is a micro-CHoCH on the lower timeframe?
Micro-CHoCH is a small structure shift on the entry timeframe: after price enters the zone, the market closes beyond the nearest opposing swing point, signaling momentum may have flipped.
Should I change my timeframes every day?
It is better to keep a small set of preset timeframe combinations and switch only when objective conditions change (volatility regime and high-impact news). Random switching usually reduces consistency.
Final note
This workflow is designed to be practical: clear zones, clear confirmation, and controlled adaptation. Implement it consistently first, track results by session (London, overlap, late NY), and refine only one variable at a time.
My Order Blok Indicator for TradingView
Here is my OB Indicator that I use in TradingView. You can change the settings in its setting panel as you need. Feel free to report any problems or suggestions you’ve had with it.